


 There are many, many ways to resize a photo, and doing so can help improve the layout of your site, and increase page load time. Here is a quick and easy, step-by-step guide to resizing a photo.
There are a variety of reasons you may need to resize a photo, but the most common are:
- You need a smaller picture to fit your website’s layout
- Your webpage is taking too long to load due to the file size of your picture, so you’d like to make it smaller to improve page speed
- You’ve heard using smaller, faster-loading photos in an online marketing strategy that can help improve your website’s placement in search engine results
- There are many, many ways to resize a photo, but we find that most of our clients want to know how to do so in the fastest, easiest way possible – and we don’t blame you!
Here is a quick, step-by-step guide to resizing a photo.
Make Sure The Photo is on Your Computer
First, you need to make sure you have the image file on your computer. If you are resizing a photo that’s already on your website, you need to download that file to your computer, or if you already have it on your computer, just make sure you know where it is.
Navigate to this Handy Online Resizing Tool
There are many online tools to resize your photos, but we’ve found Web Resizer to be the simplest, no-frills image resizer around. Make sure to bookmark this image resizing guide, along with Web Resizer, so you can find them in the future for easy reference!
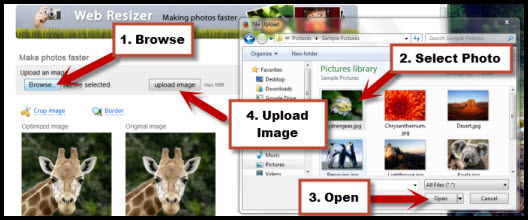
Upload Your Photo
Now, you need to upload your photo to the Web Resizer, so it can work its magic. Click on “Browse” and find the photo on your computer. Then click “Open,” and finally, “upload image.”
Resize Your Photo
Now, for the moment we’ve all been waiting for – resizing your image! The Web Resizer defaults to resize your image to be 400 pixels wide and 300 pixels tall, or 300 pixels wide and 400 pixels tall – depending on whether your photo is landscape or portrait. This will keep your photo in-scale, to make sure you don’t end up with a warped-looking photo. You can resize the image to any dimensions you like, but 400×300 is pretty standard. Here’s what the actual size of a 400×300 photo looks like:

You can play around with the dimensions as much as you like. Keep in mind that each time you change the dimensions, you will need to click apply, and then download the photo to see the true size – the preview will not show the actual size, only the resulting file size. As you can see, there are other features you can add – borders, sharpening, tint, etc. But we promised to keep this simple! So just change your image width or height (whatever you don’t select will scale correctly), click “apply changes,” and then click “download this image.”

And there you have it! Your photo should download by default to your “downloads” folder, or allow you to select a location to save the photo. We then suggest you rename the photo to something other than what the name of the original photo was so you preserve the original. Finally, upload your photo to your website, and voila!
About the Author

Nicole Vesota
Vice President & Project ManagerNicole has been working in online marketing since 2007 when she joined Top Of The List. She loves creative endeavors and spending time with her daughter.